So I wanted to try out Web App and Android App penetration testing the first software I was introduced to was BURP Suite, best in class industry standard tool for Penetration Testing.
It had crossed me as I remember when Pathao App was accused of stealing personal data (Accusation was proved and necessary actions were taken) BURP was used for testing. So I went on a journey to configure BURP for android.
In Android Nougat, we’ve changed how Android handles trusted certificate authorities (CAs) to provide safer defaults for secure app traffic. Most apps and users should not be affected by these changes or need to take any action. The changes include:
https://android-developers.googleblog.com/2016/07/changes-to-trusted-certificate.html
That was the most painful task to do as though burp was easy setup the main problem was to get the certificate working inside Android 7+. I had a Android 9 and the problem with this version (I said problem but its a benefit if you are a general user) was that it did not allow for CA Certificates that are user installed to allow proxy connections that Burp needed in order to work.
The phone I used was a Xiaomi Mi 6x Rooted with Magisk, it is currently running MIUI 11.2 Android Version 9 - Pie.
As expected I followed all steps denoted in their website: Link, I got through some of the basic steps. Then came the most painful part getting the certificate to android. The Steps over at: Configuring Burp Suite With Android Nougat are really great but the current needs are different as android is ever evolving.
Install the Burp Suite CA as a system-level CA on the device. My recommendation for the easiest solution, but does require a rooted device. Also added benefit of not having to set a lockscreen PIN 🙂
Though I say basic but its the most crucial element to succeeding in solving this simple problem.
The first thing you will need is an android device, it has to be rooted. (Use Magisk as it simply the best i have seen so far due to its ability to hide from apps)
Second you need a Linux Machine - I use Kali Linux on a virtual Machine to do my task.
Step 1: Start Burp Suite and add a new proxy listener. Make the proxy listener a Specific Address

Step 2: Export the Certificate and the Certificate KEY
First Click on Import / Export Certificate then first click on export in DER Format and Save file as cacert.der (you can use any name but I am using this and will be continuing to use this as reference name) then again do the same but this time select private key in DER format and save it as cacertKey.der . I stored them at root for easier manipultaion.
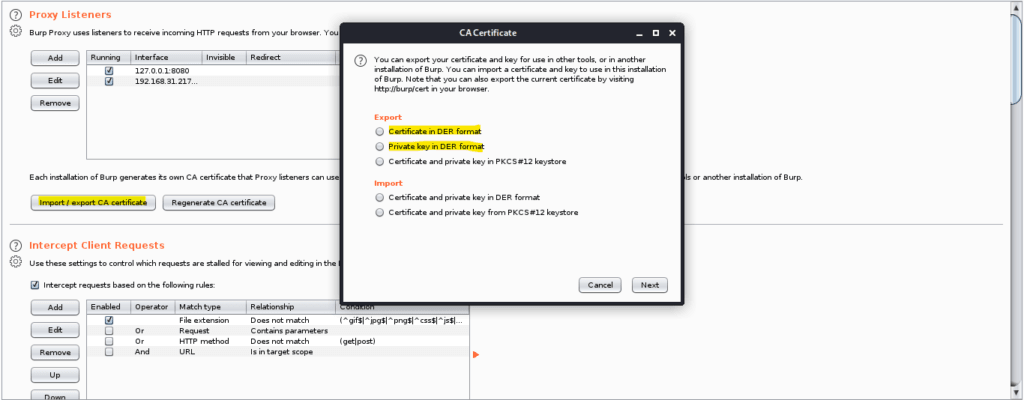
Step 3: Open Terminal and Use the following codes
openssl rsa -inform der -in cacertKey.der -outform pem -out cacertKey.pem
the above code will tell openssl to change the key from DER format to PEM format. We need this in order to sign the conversion of our cacert.der certificate to cacert.pem but the the key.
openssl x509 -inform der -in cacert.der -signkey cacertKey.pem -days 730 -outform der -out cacert2.der
The code that worked next would be telling openssl to create a new certificate in der format and save it as cacert2.der this is done in order to keep the original and the edited version. The code above also changes the validity of the certificate which is needed for apps to function properly. A typical certificate would last about 29 months so I gave about 730 days that is equivalent to 2 years or 24 Months. The signkey is our key we have converted this ensures that we are able to import it back to burp as we changed the date of issue and expiry. Next, we will convert the original to a pem certificate.
openssl x509 -inform der -in cacert.der -signkey cacertKey.pem -days 730 -outform pem -out cacert2.pem
This is needed for the android system which reads pems as a valid certificate. After the certificate is generated we will use the below 2 codes
openssl x509 -inform pem -in cacert.pem -subject_hash_old |head -1

cp cacert2.pem <Hash>.0
The first code will provide a result such as below:

The <Hash> for me is 9a5ba575. Up execution of the next code a new file will be generated with the hash and extension of zero.
Step 4: Copy the Cacert2.der and the <hash>.0 file over to android with any tools or method of your liking.
Step 5: Copy the <hash>.0 to the folder /system/etc/security/cacerts/
my preferred file manager for this is Mixplorer.
Step 6: Follow the steps over at Burp Suite - Link, use the file cacert2.der for the task and then proceed to next step
Step 7: Import into burp the Cacert2.der using the old der key.
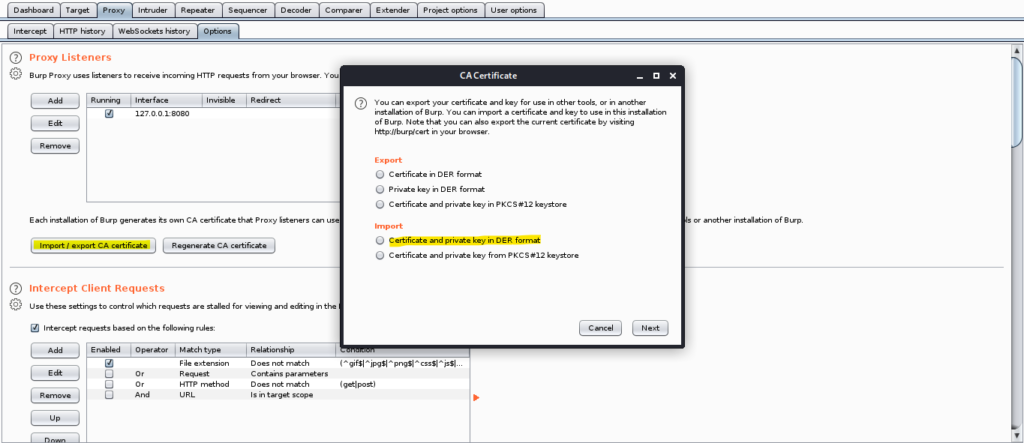
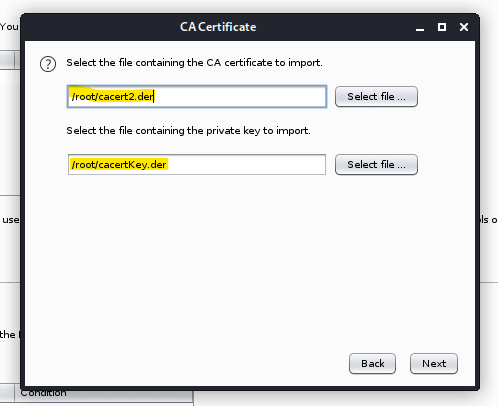
Viola All steps complete now you can start using BURP Suite with your android device.
openssl rsa -inform der -in cacertKey.der -outform pem -out cacertKey.pem

openssl x509 -inform der -in cacert.der -signkey cacertKey.pem -days 730 -outform der -out cacert2.der

openssl x509 -inform der -in cacert.der -signkey cacertKey.pem -days 730 -outform pem -out cacert2.pem

openssl x509 -inform pem -in cacert.pem -subject_hash_old |head -1

cp cacert2.pem <Hash>.0Backdoor Attack - 60 Million WordPress Sites at Risk
Ads Temporarily Disabled
I was a DIVI lover and used to recommend it in my community all the time believing it like as if it was the best thing one could expect at a price of just $200 (now 249) for lifetime, until I met Oxygen Page Builder. It was a great deal given the big community and lots of supported third party plugin, worthy mention plugin from TORTOISE IT - Like the Woo Layout Injector and the DIVI layout injector. So why did I still switch read my whole blog and you will understand.
First thing to clear is the reason for me getting DIVI:
but it was not enough for my projects such as a listing site.
Divi overall is great but the need for third party paid plugins would always get on my nerve even if they were cheap when I bought it. Compared to Oxygen this is different they give you the power to do everything yourself giving it just the right amount of nuclear power to become the best.
when it comes to comparing bloat i always felt DIVI to be bloated with features like for example the contact form. I usually end up using CF7 or Fluent Forms this are by far the smallest contact form and end up giving almost zero load time impact. Another example would be the unneeded CSS codes that are there in DIVI even if you are not using that particular module. Oxygen on this regard is bare bone thus making it by far more lucrative. Below is a chart for comparison:
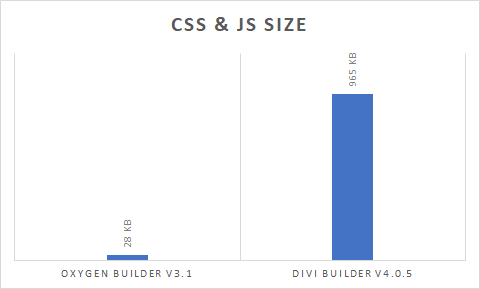
As Oxygen has less scripts and CSS, it is way faster than any other builder I have seen also the method it uses to deliver output is on par with the current trends.
Oxygen has many features some core to oxygen only. One such feature is the conditions for all elements. Conditions is like sprinkles on top of elements, it can range from cookie based condition to interaction based condition. For example for a E-Commerce homepage one can set elements based on the time and day of the month. They can also set if in mobile show some thing else show blank. Such features are available in other builders too but they are limited, limited by the fact that the code output will happen but would not be displayed where as in Oxygen the code is not even produced so less codes for the browser to process. This helps to speed up sites that are big such as E-Commerce or Listing sites with ever changing contents based on user needs and interactions.
If some is starting with page builders Divi would be a great place to start if you want all in one item but if you are a novice at wordpress oxygen would be the best option there is.
Ads Temporarily Disabled
As I started developing my portfolio section, I noticed 6 great killer portfolio tips that I thought could improve just about any web portfolio. Having a great web portfolio is a must as it helps to describe what you can do, even though you may have a CV / Resume, a portfolio stands out the most. It helps create a difference between landing a job and being the secondary choice. So lets look into the 6 great tips.

Show your best works, it will illuminate your works better instead of throwing out all the different works you have done. If you are not satisfied with a work its best to avoid it in the portfolio. This will ensure you receive quality work instead impractical tasks.
Someone browsing your portfolio only came there for a lot of reasons. Hopefully, to check out what you have accomplished, assess that which you’re able to, if they like what they see, hire you.
This ensures that the shorter, plus more obvious, you create the path to browsing live types of your work, better an impact you are going to leave on a potential employer or co-worker.
Example: Simple Portfolio
It really helps to engage a person when they can browse live versions of your hard work. Imagine how disappointed a potential employer is going to be after they go to a nice piece of work that like, and would like to explore, but it ends up to simply be considered a barely perceptible image of an online site. So, create a link and provides them genuine!
Having a design that does not only looks good: but, is easy to see, navigate, and engages an individual is very important for making a good impression online. Using the A.I.D.A. formula is a fantastic idea when making: A – you would like to capture their Attention. I – Hold their Interest D – Convince them they Desire what your offering and finally A – Lead them to take action.
For a business or any individual, having a logo and a logo to represent that brand can help get you noticed and remembered. A logo signifies strength of a portfolio website. It really is important to have someone that knows what they are doing for this one; if you’re not acquainted with the procedure yourself, rely on someone else which is. Building a brand name and logo that is certainly memorable, distinct, and truly represents the theme of your business or your work.
If you have plenty of work to exhibit though, if not think of limiting your selection for a best items of work. Think about which pieces highlight skills you would like to offer, highlight stronger interests you pursue, and constantly try to select one that flaunts something was challenging for you: this to spotlight your more advanced/valuable skills.
Having a a great web portfolio describes you and your work. It not only defines what you can do but also help you on landing high paid contracts and jobs, simply ensuring what you have to present to them. Most people look for specific niche thus the illustrations of your work will help to create a vision in their mind what to expect from you.
Courses you can opt -in to better your portfolio:
Ads Temporarily Disabled
I have recently migrated all my posts from DIVI builder to Gutenberg and plan to use it going forward. Recently diving into Oxygen Builder I found some mismatches in the CSS and they were bugging me a lot. Being a curious new player in the field I wanted to fix it.
The first set of integration work is live and is working flawlessly with few errors. Almost all the blocks were working correctly except the Embed of Facebook & Audio.
Updated it too look better on some cases.
Fixed Bug: Caption links and caption texts on images
The Installation of this integration is fairly easy. One of the greatest feature in oxygen comes to play regarding this, Inner Content. Inner Content out of the box does not do anything but the mixing of code levels it up.
<?php
add_theme_support( 'responsive-embeds' );
add_theme_support( 'customize-selective-refresh-widgets' );
add_theme_support( 'wp-block-styles' );
add_theme_support( 'align-wide' );
add_theme_support( 'editor-styles' );
add_editor_style( 'style-editor.css' );
?>.wp-block-preformatted {
display: block;
font-family: Menlo, Consolas, monaco, monospace;
white-space: pre-wrap;
word-wrap: break-word;
text-align: justify;
margin: 1em 0;}
.wp-block-code {
font-family: Menlo, Consolas, monaco, monospace;
font-size: 14px;
color: #23282d;
padding: 0.8em 1em;
border: 1px solid #e2e4e7;
border-radius: 4px;
white-space: pre-wrap;
}
.wp-block-audio{
color: #23282d;
font-size: $default-font-size;
text-align: center;}
pre.wp-block-verse {
white-space: pre-wrap;
}
.wp-block-image figcaption {
overflow-wrap: break-word;
text-align: center;
font-size: x-small;
}The above should work for all Oxygen versions.
Ads Temporarily Disabled
